We Indians love our tea, actually, we Indians love our chai. Just like the west where the day does not begin without a cup coffee, in India no day can begin effectively without a cup of chai. We make plain tea, pudina tea, cinnamon tea, cardamom tea, ginger tea and so on. But, have you ever tried chocolate tea or vanilla tea perhaps? Now you can! Try out these amazing chai recipes and give your regular chai a lovely twist.

Also read: 10 Health Benefits Of Different Types Of Tea

Chocolate Chai

Chocolate and chai, two of our favourite things, together, in one drink. How can we not love this concoction?

Chocolate Chai

Ingredients:

1 teaspoon regular tea powder

½ stick cinnamon (dalchini)

1 clove (laung)

1 heapful teaspoon cocoa powder (unsweetened)

2 teaspoons brown sugar or white sugar

½ cup water

½ cup milk

Chocolate shavings/cocoa powder (optional)

Method:

Pour the water into a saucepan and bring to a simmer. Add the cinnamon, clove, tea powder and sugar.

Bring this to a boil. Add the cocoa powder and stir with a spoon ensuring no lumps are formed.

Pour in the milk and bring to a simmer stirring occasionally. Once completely heated, strain into a glass or cup. Top it with chocolate shavings or cocoa powder. Serve hot.

Vanilla Chai

The vanilla extract gives this chai recipe an irresistible aroma and silky smooth taste.

Vanilla Chai

Ingredients:

1 teaspoon regular tea powder

2 cloves cardamom (elaichi)

2 teaspoons white sugar

1 teaspoon vanilla extract

½ cup water

½ cup milk

Whipped cream (optional)

All spice powder (garam masala) (optional)

Method:

Pour the water into a saucepan and bring to a simmer. Crush the cardamom pods in a mortar-pestle.

Add the crushed cardamom, tea powder and sugar.

Bring to a boil. Add the milk and vanilla extract. Stir occasionally.

Once heated, strain into a glass or cup. Top it with a dollop of whipped cream and a light sprinkle of all spice powder. Serve hot.

Also read: Benefits Of Drinking Green Tea

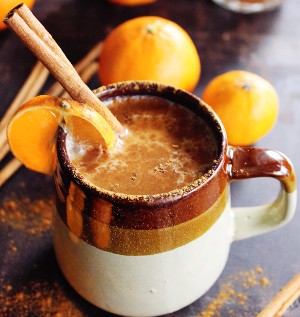
Orange Chai

We never thought chai could be made more refreshing than it already is, but with the addition of orange, it’s even more awakening and delicious.
Orange Chai

Ingredients:

1 teaspoon regular tea powder

½ stick cinnamon (dalchini)

1 small orange zest

2 teaspoons honey or white sugar

½ cup water

½ cup milk

Sliced orange (optional)

1 stick cinnamon (optional)

All spice powder (garam masala) (optional)

 Method

Pour the water into a saucepan and bring to a simmer. Add the cinnamon, tea powder, orange zest and sugar.

Bring to a boil. Add the milk and stir occasionally.

Once, the milk has boiled, turn off the heat and strain into a glass or cup.

Garnish with sliced orange and cinnamon stick if desired. You can also sprinkle a little all spice powder around the rim. Serve hot.

What are you waiting for! A true chai lover would definitely give these delectable chai recipes a try. Are you one of them?

You are a working woman who is pressed for time as you juggle your domestic life and your professional one. At times, you do not have enough time to cook luxurious meals to take to work for lunch, and finally end up spending money to buy food from your office cafeteria or hotels. But can this be an everyday affair? No; right? Home-cooked meals are always the best as it is healthy and nutritious, and cooked as per your preferences. So, here are a few healthy lunch options that can help to save time as well as provide healthy amount of nutrition and your choice of taste.

Salad

If you are someone who watches weight, then salad is a good option. Chopping a few onions, tomatoes, carrots, cucumber and coriander, and mixing them with boiled corn, a pinch of salt and few drops of lemon can be an easy early morning recipe. You can even add legumes and mushrooms to the salad. This big bowl of salad with your favourite veggies can provide you with the necessary vitamins and minerals. If dicing these vegetable can be hectic during mornings, you can chop them the previous night and store in the refrigerator. All you have to do when you wake up is to mix and pack them.

Roti roll

There are many easy sabzi recipes that can go well with rotis. You can make chapati dough the previous night and store in the refrigerator. The next day, you can make the chapatis and a quick sabzi and pack your lunch. Alternatively, you can stuff the sabzi inside the roti and roll it. While eggetarians can make scrambled eggs, non vegetarians can opt for chicken sausage roll.

Dal rice

Dal rice is one of the most favourite food combinations in India. It does not require too much effort and is easy to cook. You can mix dal with rice and pack as one, rather than carrying both in different lunch containers. Remember to mix extra dal to avoid drying up of your lunch.

Vegetable pulao

Pulao is a mix of rice with veggies and few spices, and can be cooked easily. You can chop some veggies the previous night and store them in the refrigerator to keep them fresh. There are many ways of cooking pulao, but an easier option would be to cook the raw vegetables along with spices and rice together.

Idlis

Idlis are a south Indian speciality cooked by steaming rice batter. Best combinations for idlis are chutneys. There are a variety of options; but, coconut or peanut chutneys can be made easily when you are in a hurry for your day’s work. Pack a couple of idlis along with any chutney and your lunch for the day is ready.

Stuffed parathas

If making the batter/dough and chutney/sabzi separately is a tough job, stuffed parathas are a good option. When you are preparing the chapati dough, you can mix spinach and roll it to make palak (spinach) paratha. You can also combine potato, paneer, radish and onions to the dough to make the respective paratha. In this way you don’t lose out on your veggies as well as a home-cooked lunch. Stuffed parathas can be combined with curd or pickles.

Now, can you give yourself a reason to not pack lunch from home?

Any kid would tell you this – Maggi noodles is the best food on planet Earth! The fondest memories of my childhood are watching TV and enjoying my own hot bowl of mouth-watering Maggi noodles. And very honestly even as an adult, I can’t seem to get enough of Maggi. Nobody can! But you can do so much more with your favourite Maggi; here are some recipes. Enjoy!

Maggi Masala Tikki

Maggi masala tikki

Ingredients:

1 packet Maggi noodles

2 boiled potatoes

1 finely chopped onion

1 cup of vegetables of your choice

Bread crumbs

Salt to taste

3 tablespoons ginger-garlic paste

1 teaspoon chaat masala

Chopped coriander leaves

Oil for frying

Method:

Make Maggi as per instructions on the pack making sure to keep it dry, if you have leftover Maggi you can use that too. In a big bowl, grate the boiled potatoes, add the vegetables to it and mix it with Maggi. Add bread crumbs to help form tikkis. Add the chopped onion, ginger-garlic paste, salt, chaat masala and coriander leaves. Make round tikkis with the mixture and shallow fry in some oil.

Mag n Cheese

Mag n Cheese

Ingredients:

1 packet Maggi

1 tablespoon butter

1 cup of grated mozzarella cheese

Half a cup grated cheddar cheese

Half a cup boiled corn

Water

Salt to taste

Method:

Bring 1 cup of water to boil, now add Maggi and the masala tastemaker to it. Also add boiled corn and 1-2 pinches of salt. Half-cook the noodles and turn the flame off. Grease a baking tray with butter, transfer the noodles to the baking tray and add the mozzarella and cheddar cheese to cover it completely. At this stage you can choose to add your choice of vegetables however, that is optional. Place the baking tray in a preheated oven for 5 minutes on 150 degrees.

Tip: Make sure when you cook your Maggi noodles, it isn’t too watery.

Maggi Poha

Maggi poha

Ingredients:

1 packet Maggi

2 tablespoons oil

1 boiled potato

1 finely chopped onion

1 cup boiled green peas

Half a teaspoon finely chopped green chillies

A sprig of curry leaves

Half a teaspoon mustard seeds

Salt to taste

A pinch of asafoetida (hing)

Coriander leaves to garnish

Method:

Cook Maggi noodles without adding the tastemaker to it. Once cooked, drain the excess water. In a heavy bottomed pan, heat oil and add mustard seeds, curry leaves and onions. When the seeds crackle, add asafoetida and green peas and chillies. Finally add the remaining ingredients along with pre-cooked Maggi and its tastemaker. Fry for 5-10 minutes. Serve hot garnished with coriander leaves.

Maggi Noodle Bhajiyas

Maggi noodle bhajiyas

Ingredients:

200 grams paneer

Half a cup corn flour

Half a teaspoon finely chopped green chillies

1 packet Maggi

Salt and pepper to taste

Oil for frying

Method:

Break the Maggi cake into small pieces and boil until half cooked (without adding the tastemaker). Make small cubes of the paneer and add them to a big bowl. Now add green chillies, salt and pepper, Maggi masala tastemaker and corn flour to the paneer and mix well, making sure not to break the paneer. Finally, coat each paneer cube in the half cooked noodles and deep fry until golden brown. Serve with delicious mint chutney.

Quick Recipe For Mint Chutney: In a blender, add 1 cup each of mint leaves and coriander leaves, salt to taste, 1-2 teaspoons of sugar, juice of one lemon, and blend with 2-3 tablespoons of water. Drain and serve.

Mango Maggi Surprise

Ingredients:

1 packet Maggi

1 cup thick mango syrup (made with mangoes and sugar)

2-3 tablespoons caramelised sugar

1 cup chopped mangoes

Method:

Boil Maggi until fully cooked (we don’t need the tastemaker for this recipe) and drain out the excess water. In a heavy bottomed pan, caramelise the sugar with

Boil Maggi until fully cooked (we don’t need the tastemaker for this recipe) and drain out the excess water. In a heavy bottomed pan, caramelise the sugar with a little bit of water and two drops of oil. In a bowl, add the cooked Maggi, caramel, and mango syrup and mix well. Add the chopped mangoes on top of the noodles and refrigerate for 2 hours before serving.

Mango Syrup: In half a cup of water, add chopped mangoes and 2-3 tablespoons of sugar. Cook until syrup boils and forms a layer of shine on the top. Cool and use.

Maggi Noodle Soup

 Maggi noodle soup

Ingredients:

1 packet Maggi

1 can of creamy sweet corn

3-4 cups of vegetable or chicken stock

1 cup chopped vegetables

1 cup shredded boiled chicken

2 tablespoons corn flour

1 teaspoon sugar

Salt and pepper to taste

2-3 tablespoons spring onions finely chopped

Method:

In a heavy bottom vessel, cook the creamy sweet corn in the stock for 5 minutes. Add the vegetables, chicken, salt and pepper, and sugar and simmer for 10 more minutes. In a separate vessel cook Maggi as per instructions; let it be partially soupy. Mix the corn flour with half a cup of water and add to the soup. Now add the Maggi to the simmering soup and mix well. Garnish with spring onions and serve in separate bowls.

So there you are! Do give these recipes a try. Bon appétit!

Sometimes you don’t have all the time in the world to just take care of your fitness. Here we list for you a few easy 15-minute workouts that will make you look fabulous in no time.

Dumbbell sumo squat

If you want proper shaped legs, back, shoulders and also a great-looking posterior, this exercise will work wonders for you. Stand with your back straight, toes pointed out and your feet shoulder-width apart. Grab two dumbbells of equal weight in each hand. Squat down with arms extended keeping the lower back taut and upright. Keep on holding the pose for a few seconds before you lift yourself up to the starting position again. Repeat this process three times.

Dumbbell sumo squat shapes legs, back, shoulders and hips

Burpee

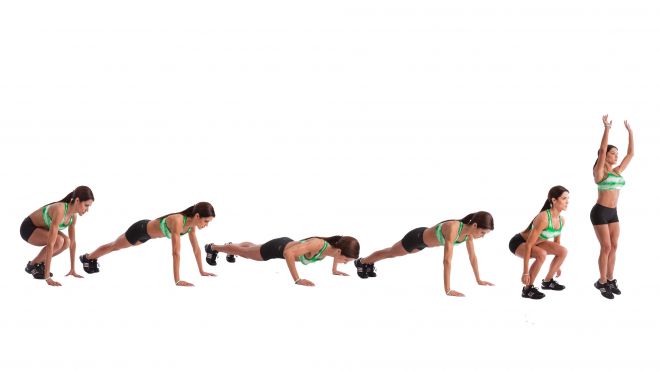
If you are running short of time but need a full work out then this is the apt exercise for you. Stand straight. Then come to a complete squat down position with your hand placed in the front, and your knees near your chest. Now spring like a frog and push your legs behind as required for push-ups. Do a push-up and now go in the reverse order to reach back to the original standing position. This workout tones your arms, shoulders, legs and endurance. To reduce the difficulty level, you can avoid the standing part of the exercise.

The sequence of Burpee

The reverse plank

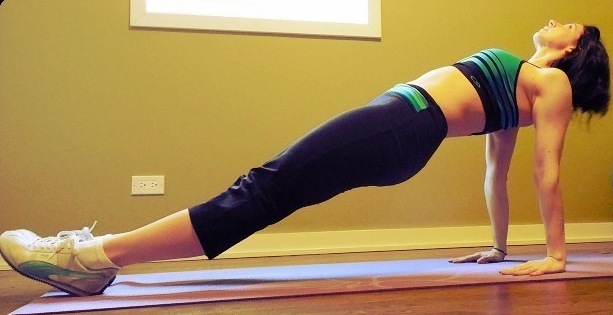
This exercise is much harder to do than it looks, but it is advantageous as it tones the abs, triceps and posterior muscles in your body. Sit down on the floor and place your palms beside your hips. Pressurize onto your heels (toes up) and palms to lift your frame. Keep your body in a straight line as you continue to look up to the ceiling and hold the position for 30 seconds. You might not be able to keep the straight position for more than two or three breathes in the beginning. It’s only normal!

Reverse plank
An easier version of the reverse plank

Whenever we need to go out to a party or a function, one of the major things that we are apprehensive about is “How will my hair look?”, “How are they supposed to look?” Here we dole out some tips to you ladies so that you flaunt what you’ve got! So, glam up and look your best.

Before you embark on a mission to change your hairstyle, ensure that it is always well conditioned, and don’t forget that conditioning hair serum – it is a saviour! Now, choose your style!

Up-dos

Updos can make you look stylish instantly

Opt for a deep side parting, start at the left temple and sweep across to the right ear. You should go for one of them, either go for a super slick wet-look up-do or leave a few strands loose on your face for a soft, dainty feminine feel.

Mermaid Waves

Mermaid curls look extremely casual and sexy

This is good news for all the lazy ones! The latest trend this year is laid-back, fuss-free mermaid waves. The more randomly placed and tousled the better! All you have to do is plait your damp hair and sleep.

Short hair

Pixie cut looks fashionable and chic

Bob cut is back and how! This cut has ruled the roost on the ramp this year, and more and more girls out there are opting for this easy-to-maintain look. Try a side part long pixie cut, an undercut inspired by a punk or you can go for a close crop also.

Fringes

Whether you have a short bob cut or a bowl one, you can make a statement from your fringe this year. If you are the one who prefers a soft cut then long fringes will frame your face.

Sport a fringe like Priyanka Chopra’s

Wet look

The season’s most in look is the wet look and is wearable. Yes, seriously! Spread high shine serum on your hair before styling and go out flaunting that wet look of your hair.

Low ponytail

Abandon bad hair days by mastering the fashion ponytail. Super sleek and secured low at the nape of the neck or brought in front; make a low ponytail and finish with a ‘spritz’ of high gloss hairspray for a chic look.

Bring your low ponytail to the front like Selena Gomez does

When it comes to eating right, one of the worst things to do is treat it like a chore. And because our mentality has it that healthy food is boring, we don’t even take a minute before calling for pizza. But guess what? Comfort foods, like everybody’s favourite pizza, burger, or fries, can be made healthy too!

Also read: Tips to keep your kitchen healthy and clean

Of course, you’ll have to do away with all the bucket loads of oil and fattening ingredients that are not doing any good for your waistline. Today I’m going to share a few recipes for healthy homemade everyone’s favourite junk food, which will not give you a reason to worry about your weight!

Hot’n’crispy French fries:

Who loves hot crispy fries? I do! And because I can never satiate my cravings for a huge bag full of French fries I decided to make them healthier. Here’s how…

Baked french fries are a tasty yet healthy option to calm your junk food craving

You will need:

4 large potatoes or sweet potatoes if you want extra, extra healthy

One tablespoon olive oil

Salt as per taste

Water

Method: Wash and cut the potatoes into thin long slices (you may keep a little bit of the skin on for taste and health benefits). In a large pan, boil some water and dunk the potatoes in with some salt. Once they’re done, drain them on a piece of clean cloth and give it a shake to make the edges a little rough. Drizzle a baking tray with olive oil and spread the potatoes out on the tray. Bake for 30-40 minutes or until golden brown and crisp. Yummy, crispy and healthy French fries are ready to serve. Don’t forget the salsa dip!

Also read: Are you obsessive about healthy food

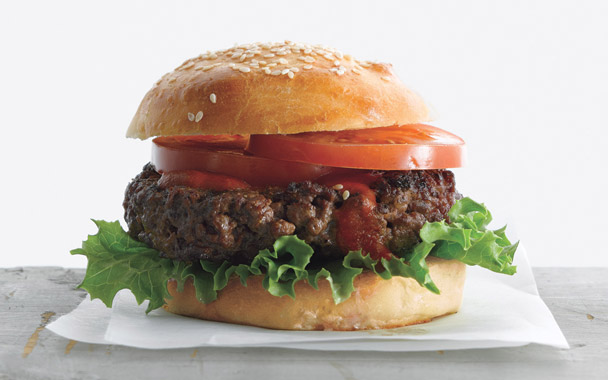
 The massive hamburger:

Hamburgers top everybody’s favourite foods list. When it comes to burgers, bigger is always better. But the best burger and the current favourite of mine is my mom’s recipe of a good healthy homemade one. It’s a must try.

When it comes to burgers, it’s always the bigger the better

You will need:

Whole grain burger buns/Sesame buns/Multigrain buns

Fresh lettuce

Tomatoes

Onions

Cabbage leaves

Many slices of juicy grilled chicken ham/vegetable patties

Tangy homemade salsa sauce

Low fat mozzarella cheese/ fat-free cheddar

Tomato ketchup

Mustard sauce

One teaspoon of either low fat mayo or olive oil

Also read: 6 awesome Maggi noodle recipes

Method: This one is no less than a food extravaganza. Get your chicken ham slices/veg patties and the burger buns grilled. Wash and slice the tomatoes and onions. Wash the lettuce and cabbage leaves thoroughly and pat them dry with a soft kitchen towel or simply spread them on a plate and put them in the freezer for 5-10 minutes.  Now, once you’ve got all your ingredients handy, start piling them up in 2-4 layers however you like it. For a fun food session, let your family members do the stacking themselves! Vegetarians can make the same by using veg patties instead of the chicken.

Crunchy crust pizza: Pizzas may be a takeout speciality but once you try this pizza-made-healthy option you’ll definitely know why it’s better. Most times, the chewy pizza crust adds to the inches on our belly; so in this homemade variety I used the ever so healthy whole grain chapattis with a twist!

Whole wheat pizza can also be yummy! Try it to believe it.

You will need:

For the crust:

1 cup whole wheat flour

1 cup all purpose flour (maida)

2 teaspoon yeast

1 teaspoon salt

Hot water

1 tablespoon olive oil

For the toppings:

Black/green olives

Red/Yellow bell peppers

Onions

Tomatoes

Jalapenos/pickle

Dried Oregano/Dill leaves

5 sprigs of parsley/fresh coriander leaves

200 grams cottage cheese/soya chunks/chicken breast/lean minced chicken (steamed)

Boiled baby corn/corn kernels

One bowl of grated feta cheese/goat’s cheese

One bowl of grated fat-free mozzarella cheese

Salsa pizza spread

Salt and pepper to taste

Method: Combine the whole wheat flour and the all purpose flour with yeast, salt and hot water in a food processor, to make a light and fluffy dough. Knead well so that the dough is soft. Lightly flour a flat surface covered with plastic wrap; let the dough rest for 30 minutes maximum. Meanwhile, chop the olives, tomatoes, onions, jalapenos, and the herbs. Roll out the dough in circles or rectangles and use a fork or toothpick to prick it. Spread a thick layer of salsa spread on each rolled out crust. Top the pizza crust with the chopped veggies, herbs, and cottage cheese/chicken (or whatever you are using as a main ingredient) and season it with salt and pepper. Sprinkle the feta and mozzarella cheese on top and bake in a pre-heated oven at 450 degrees C for 10-12 minutes. Serve immediately.

Also read: Tips to resist junk food

Many of my friends have been asking me how I manage to wear my scarf in so many styles. So I thought of doing a tutorial. Basically, I usually wear a scarf in 3 simple ways and later style them differently according to my outfit and the occasion. Here are few styles that I absolutely love and do them very often.

Also read: Cheat codes to look thinner

The big ben…er bun:

Bun-style scarf looks really elegant on any outfit

I learnt this style from a YouTube subscriber called Dina Tokio. It is so very simple and looks really, really chic and stylish. Here’s how:

You’re going to need a pretty scarf of your choice and some cute scarf pins. Begin by making a big high bun in your hair and place the scarf over your head in a way that the part hanging down the left side is shorter than the one on the right side. Now take both the sides behind your shoulders and make a lose bun and bring them in the front again (from the opposite sides of course!) Now go ahead and pin both the sides over your bun and secure the scarf with pins.

Simple everyday style:

The other day I was just trying to wear a scarf around my head in a way that I saw a friend doing a few months ago, and I messed up. Not really! Because I figured out a new way to style a hijab! Anyway so here’s how to do this style.

For this one you’ll need a bonnet cap, a maxi hijab/ a maxi scarf and some straight scarf pins. Tie your hair in a loose low bun, and wear your bonnet cap. Next, place the maxi scarf over the bonnet in such a way that both sides of the scarf hanging down your shoulders are equal in length. Now pin the sides together under your chin. Take the left side of the scarf and fan it out loosely, now drape it over your head from the same side going backwards      . Secure it with a pin. Repeat the same on the right side. Tuck in any ends that are hanging lose and secure with some more pins. And what do you know! Isn’t it such a cute and simple style?

Also read: This summer go head over heels

Casual day-out style:

This is ever so simple and the most common style I’ve ever come across. All you need a really long rectangular scarf. Start by draping the scarf over your head and in case you’re wearing a bonnet underneath, you can let the sides hang loosely around your face. If you aren’t wearing anything to cover your head, drape the scarf as per the shape of your face and pin it underneath your chin. Both sides of the scarf should be equal in length. Now take the left side and drape it over your head going across the right ear, no need to pin it. Drape the right side over the head going across the left ear and tuck it underneath your chin. If the day is really windy then use safety pins wherever you feel the need to.

Wrap around style neck scarf

Apart from styling the hijab over your head, if you don’t wish to cover it, you could simply wrap it around your neck, loosely without worrying much about being neat. Tuck the loose ends into your outfit or underneath the scarf. Is it hot or what?

Also read: Transitioning from conservative to chic

Scarf head-band

You could also use a smaller scarf to make it into a no-headache head band. Fold it into triangles 2-3 times over, until it looks like a tie. Then drape it over your head and tie it at the bottom of your pony tail. Drape it across your head again going over the same area and pin it on both side. Open your pony tail and that’s your scarf head band look.